
Risk of Rain 2 Huntress is unlocked by default. She uses homing attacks and evasive movement, with a low health pool that makes avoiding damage a central part of her playstyle. Start with Strafe for a straightforward early primary, use Laser Glaive for groups, and preserve Blink for a useful escape or route correction. Her seeking attacks simplify aiming, but they do not make her immune to enemies while she fires.
The current loadout includes Laser Cyclone, added with the October 2026 free update. Older character screens and guides may show only Laser Glaive in that slot. Treat the new alternative as a separate juggling mechanic rather than assuming it behaves like another charge of the original bouncing glaive.
Recognize Huntress and her basic combat loop
Huntress wears red armor and a scarf and carries a bow. Her primary attacks lock onto nearby enemies, allowing you to focus more attention on movement. She still needs an eligible target: pressing the seeking primary without a lock does not produce the same free-fire behavior as a conventional gun.
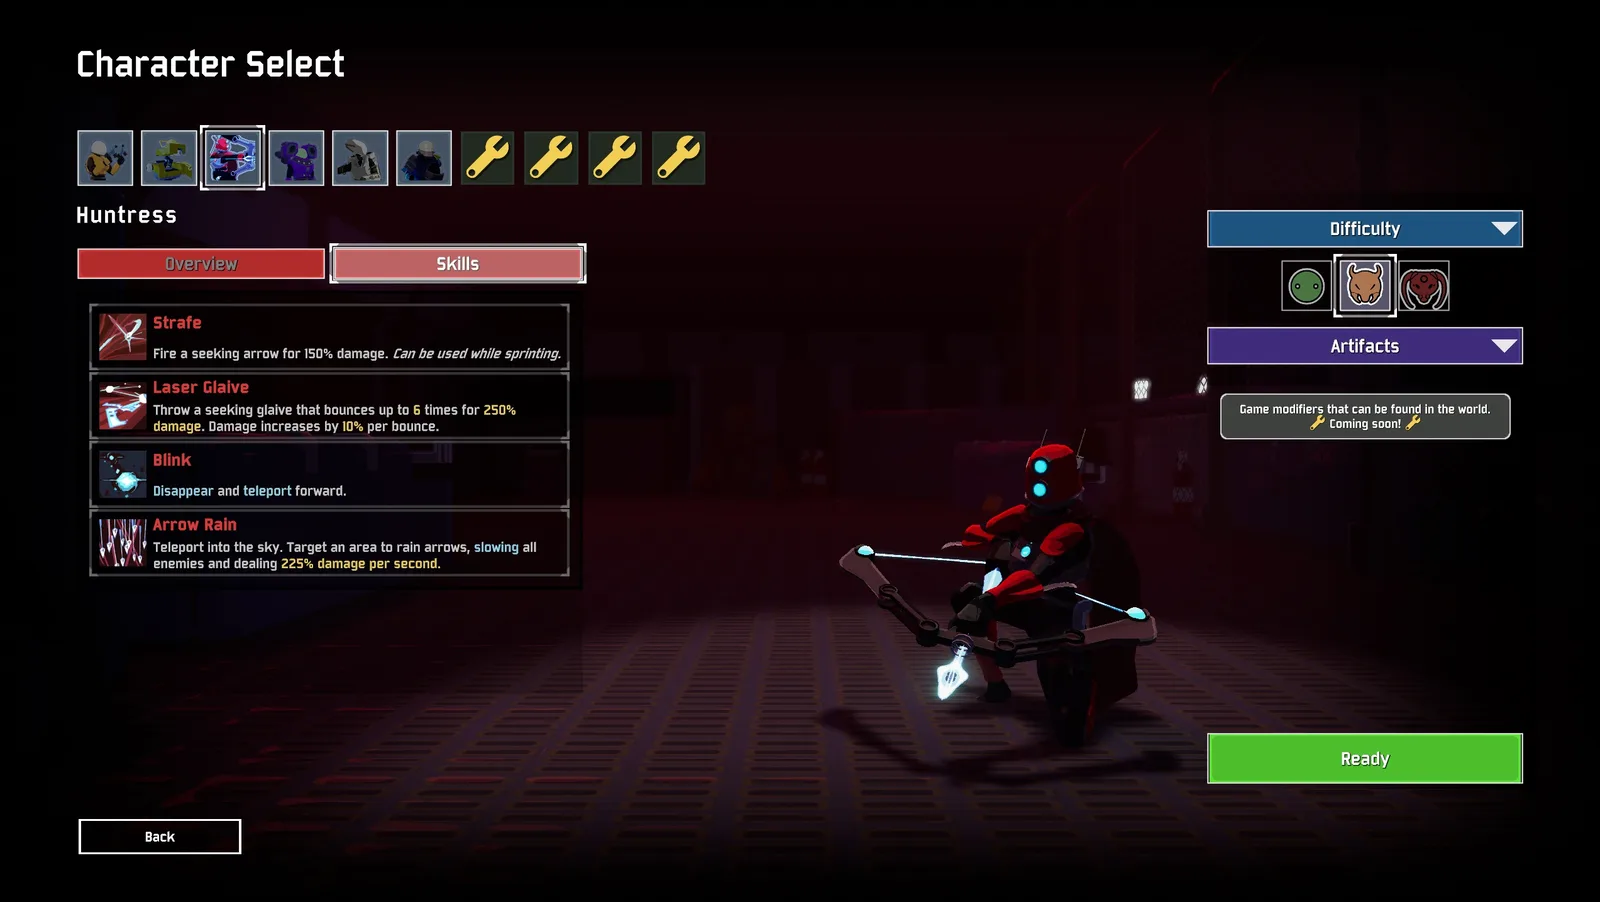
The starting loop is movement first, seeking primary attacks while maintaining distance, then secondary or special attacks when the target arrangement suits them. Look at where enemies are approaching from, not only the monster currently highlighted by the lock. The homing system handles part of aiming; it does not decide the safe route for you.
The basic seeking primary selects the closest eligible enemy within its targeting range. That can be convenient against a group, but it can also make a nearby small enemy take priority over a boss you intended to damage. Change position when you need a different target to become the practical focus instead of repeatedly firing and assuming the lock must match your preferred target.
The image shows an older selection interface and is useful for identifying the survivor. Current skill options and corrected damage behavior should be judged from the loadout you are actually using, rather than copying every number visible on that historical screen.
Choose Strafe for simplicity or Flurry for critical scaling
Strafe fires a seeking arrow for 150% damage and is Agile, so it can be used while sprinting. At base attack speed, it fires every half second. Its short firing rhythm is useful in the early game because you can keep attacking without waiting through a longer volley startup.
Flurry fires a volley of three seeking arrows. A critical volley fires six arrows instead, with those arrows also receiving critical damage. This is why critical-strike support is particularly meaningful for the alternate primary: the successful critical changes both the damage multiplier and the number of projectiles.
The trade is timing. Flurry has a slower base volley rhythm than Strafe, so it can feel weaker before useful critical chance arrives. Do not judge the alternative only from what a fully developed inventory can do. Compare the early stages you actually need to survive as well as the late-game scaling you hope to reach.
A practical starting choice is Strafe while you are learning the survivor or want immediate consistency. Try Flurry when you can manage its volley rhythm and want an inventory that rewards critical chance. Neither choice eliminates the need for movement, group control, and a strong response to a boss.
Both seeking primaries need a target lock. If an attack appears not to fire, inspect targeting and distance before assuming a cooldown problem. The basic lock-on range is sixty meters, but positioning around cover and other enemies still affects which target receives your attention.
Use Laser Glaive when the group supports bounces
Laser Glaive seeks a target and can bounce up to six times. Its damage rises by ten percent on each successive bounce, so the later hits can be stronger than the first. Groups of eligible targets make its bounce behavior useful; one lonely enemy does not offer the same arrangement as a clustered wave.
Backup Magazine adds secondary charges and can let you use multiple glaives during a busy fight. It provides another opportunity to clear or soften a group, rather than raising the damage of the first bounce by itself. Keep an eye on the remaining charge count when the stage suddenly fills with enemies.
The glaive's later hits can meet the Bands' high-damage trigger condition. That interaction is different from assuming the first 250% hit always triggers a Band. Read the effect as a result of the later, amplified bounces and the item's availability, not as a guaranteed reward from every cast.
The casting animation can also affect your movement. Jumping during it sends Huntress higher, and other abilities can alter the sequence. Learn the movement in a controlled fight before depending on it to escape a hazard. Hovering or gaining height does not stop enemies from attacking you.
Learn Laser Cyclone as a throw-and-catch skill
Laser Cyclone throws a spinning glaive that deals damage as it passes through enemies and then returns. Catching it ends the current cyclone unless you repeat the input during the catch window to juggle it into another throw. Each juggle increases its damage rate, so returning attention to the projectile matters as much as the initial target.
The skill has two charges, and each throw, including a juggle, consumes one. Only one cyclone can be out at a time. Extra charges are not permission to throw several independent cyclones across the battlefield simultaneously; they support additional throws within the skill's actual single-projectile behavior.
The catch occurs when the projectile reaches within five meters of Huntress. The input can be made during the catch or shortly before it, within the documented small timing window. Practice with the projectile's return path visible, then add movement once you can recognize the return consistently.
A large enemy can end the outgoing flight early, and repeated juggles make the cyclone travel faster. A timing pattern that worked for the first throw may therefore need adjustment after the projectile's speed changes. Avoid staring exclusively at a boss health bar when the next useful action is catching and rethrowing the glaive.
Critical chance is rolled on the first throw and retained across its juggles. A prolonged sequence therefore follows the initial roll rather than rerolling independently every time you press the secondary. The practical decision is whether you can safely maintain the juggling sequence in the current encounter, rather than assuming another input must generate a new critical opportunity.
Pick Blink for vertical access or Phase Blink for repeated dodges
Default Blink teleports in the direction the camera faces. It can move upward or downward as well as forward, giving it a useful role in terrain access. Its distance scales with movement speed, so a faster inventory also changes how far your route correction travels.
Phase Blink stores up to three shorter teleports and recharges each charge quickly. Its movement is horizontal; looking upward does not turn it into the vertical traversal offered by default Blink. Pick it when frequent short repositioning fits your fights, while preserving another way to handle elevated terrain.
Both abilities reset vertical momentum. They can therefore be useful around a fall, but the destination still matters. An escape that puts you beside a different threatening enemy is a route change rather than a solved defense problem. Check where you will appear, especially when movement-speed items have changed the travel distance.
Do not spend every available charge on ordinary travel immediately before a dangerous encounter. Holding an escape option gives you room to correct a mistake without abandoning all damage. Huntress's low health makes that reserve especially useful when a projectile or close enemy interrupts the route you planned.
Choose the special around single targets and area control
Arrow Rain teleports Huntress into the air and targets solid terrain for an area of repeated damage and slow. It is better suited to enemies remaining inside an area than to an airborne target moving beyond the chosen ground location. Its repeated hits and targeting requirement explain why it can feel less effective against some bosses or flying threats.
The old displayed value of 225% damage per second is not the corrected behavior in the supplied current skill record. Judge the ability by its actual area and repeated hits instead of building a damage comparison around that outdated screen number. More importantly, consider whether the enemy will stay in the area long enough for the attack to contribute.
Ballista moves Huntress backward into the air and provides up to three energy bolts. It offers a more direct burst response to a single important target, though you must aim the bolts. This gives the survivor a different damage task from the seeking primary: target acquisition and shot placement still matter.
The special's movement is part of its cost and opportunity. Use it with awareness of the landing and follow-up route. An aerial firing opportunity may help you see the target, but it also leaves you vulnerable if you stop watching projectiles or assume enemies cannot reach you while the special is active.
Match items to sprinting, repeated hits, and your selected primary
Rose Buckler supports a survivor who spends time sprinting by adding armor during that condition. Huntress can continue relevant attacks while sprinting, so the pairing fits her evasive loop. Maintain the condition deliberately rather than assuming the item supplies the same defense while you stand still.
Attack speed supports the primary rhythm. Critical chance becomes particularly useful with Flurry's larger critical volley. Backup Magazine supports secondary availability, especially if groups repeatedly overwhelm the one glaive you have ready. These items address different problems, so choose from the bottleneck you are experiencing.
Movement support helps you maintain distance and changes Blink's travel. Combine speed with awareness of where the teleport ends. Large movement upgrades can make a once-comfortable short correction carry you farther than intended, which is a reason to adjust your inputs rather than reject movement entirely.
For defense, prioritize a workable avoidance route and the effects you can keep active. Her homing attacks are an opportunity to watch the battlefield more carefully. Use that freed attention on approaching enemies, projectile lines, remaining movement charges, and the next safe place to continue attacking.
Correct targeting and movement before blaming damage
If the primary refuses to fire, inspect the target lock and range. If the boss receives little damage while small enemies die nearby, check which enemy the seeking attacks selected. If you die after a special, examine the movement and landing rather than evaluating only the damage on the attack.
Huntress rewards maintaining several pieces of information at once: the current target, the route you are running, and the next escape or secondary opportunity. Begin with a simple loadout and learn those decisions. Add Flurry, Phase Blink, Ballista, or Laser Cyclone when their different conditions solve a specific problem in your runs, rather than replacing every default skill just because an alternate is available.